Quantcast
Channel: My Messings
Viewing all 144 articles
Browse latest View live

Sewciedone Dress

$
0
0

This is the last piece of this gorgeous spotted cotton sateen that I bought back in April of 2011. I feel I have done it justice.

The rest of the 11m stack that I bought with this fabric became a Crescent SkirtPortrait Dress and a brightly coloured quilt. Adding in this dress, each of the four are very different. It's interesting to see what varied potential just one type of fabric can have.


This dress is a mash up of the bodice from the sewcietea dress (without the contrast band), and the skirt from the Dear and Doe Belladone. This version of the belladone skirt incorporates the alteration I mentioned intending to do at the end of my post about my Roisin Dress, which I am calling a "Full Bum Adjustment", and I intend to talk about properly another time.


To add some interest to the dress, I decided to add piping. I also think that the miss-match of the spots with the waistband would have looked strange without anything defining the seam. I initially thought of flat piping, but decided to woman up and go for the real thing. This is the first time I've done "proper" piping, and as straight forward as the process was, I wouldn't want to do it on anything where I'm not sure of the fit.


As I wasn't sure about how to handle the piping and an invisible zip, I elected to hand-pick a dress zip into the centre back seam of the dress.


The dress is lined throughout with (I think) some white voile (I get the light weight cotton fabrics a bit confused), and has some interfacing (probably slightly heavier than ideal) in the waistband.


I couldn't be more happy with the construction, fit and overall look of this dress.


Pattern: Self-drafted 'sewcietea' bodice, Belladone by Dear and Doe skirt
Fabric: Cotton Sateen from Spotlight
Notions: Thread, interfacing (for waistband), matching dress zip, white voile for lining and piping fabric, smallest piping cord I could find.

Maxi Dress

$
0
0
Last January I made my first maxi-dress by extending my t-shirt pattern into a dress. That dress has had a reasonable amount of wear through the hot weather so I'd been keeping an eye out for some suitable fabric to make another one.


I found this rayon jersey in Spotlight recently and knew I'd found my fabric. The last version I was always tugging up the bodice as the arm holes were too low, so I added about 1.5" to the bottom of the armholes this time around to solve this problem.

I spent quite some time cutting out the pieces, and think I've done quite a good job of matching the stripes down the side seams:


I added some 1" strips of red jersey to finish the neckline and armholes; pressing them in half, stitching down the inside first with a zigzag and then folding it over and zigzagging along the edge of the outside.


I'm still not completely convinced about how flattering this dress is, but it's comfyness redeems most misgivings.


Pattern: Self drafted maxi dress (inspired by Mission Maxi)
Fabric: Rayon Jersey from Spotlight, some scraps of red jersey
Notions: Just thread!

See also: Creative PursuitsLazy Stitching,  Ada Spragg, Notes from a mad housewife

Also, as the selvege of the fabric professed to be a leopard print (I know, it confused me too), I guess this could be a sneaky entry for Jungle January.

Ziggi - A day's worth of muslins...

$
0
0
So I spent today making muslins for my planned Ziggi jacket. Yes, muslins plural, and I'm not done yet. I kinda think I would have been better off just drafting myself my own jacket, I wouldn't have been much worse off given what you actually get when you buy the Ziggi pattern, it's not like the instructions are anything worth paying for.


First up, let's recap... 
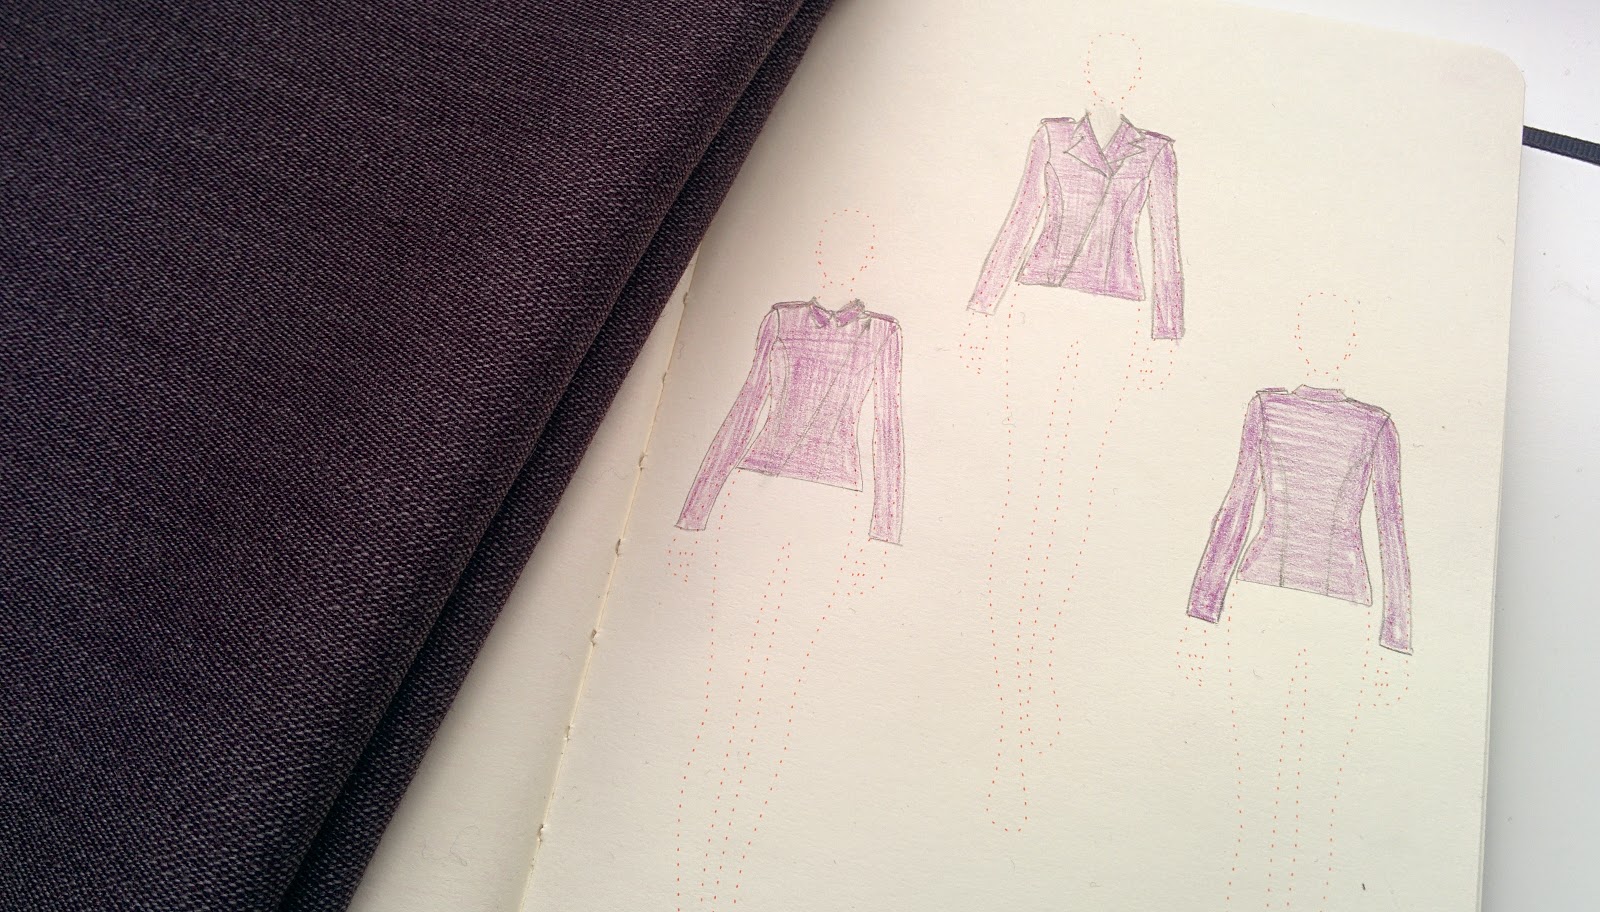
I have some gorgeous aubergine wool suiting that I want to make into a biker style jacket, and from limited selection of options, I settled on the Style Arc Ziggi pattern.

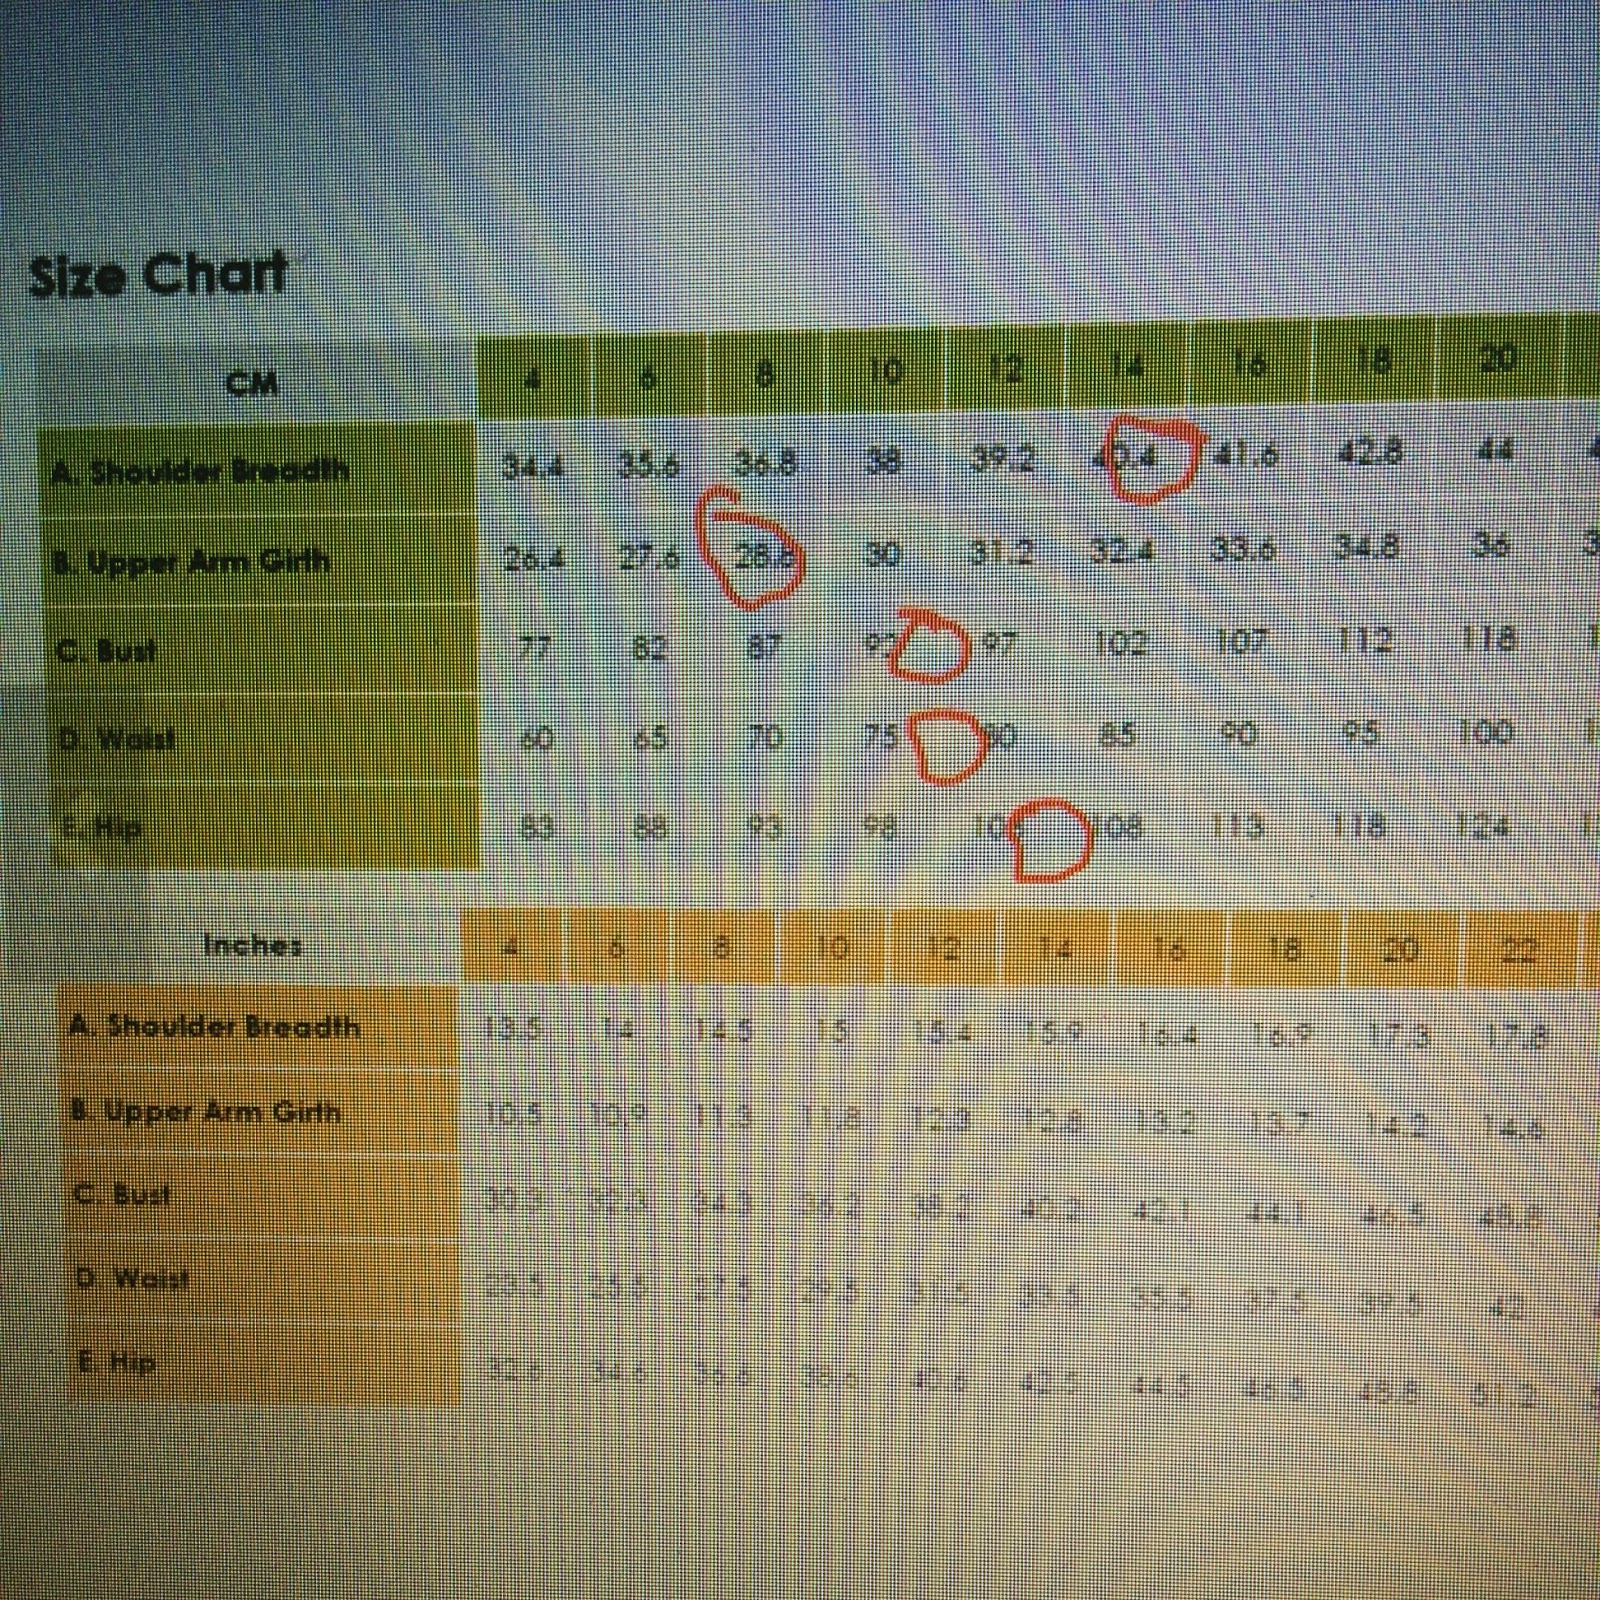
Now, the style arc patterns are single sized, so you can print only one size at a time.


My bust and waist come in between the 10 and 12, and hips between 12 and 14. For this reason I chose the size 12. Interestingly, my "upper arm girth" places me in the size 8, but my "shoulder breadth" just above a size 14. When you buy the pdf pattern you get three sizes, so I bought the size 10-12-14 bundle of patterns.


Above is the muslin of the size 12, straight out of the envelope.

Starting with the good; I really like how the collar is sitting. And despite the size chart suggesting that the sleeves would be too big I like the width of the sleeves.

And onto the bad issues...

The pooling at the back is somewhat expected based on my body shape, and I didn't worry about that straight away, working on the principle of starting at the top and working down with fitting... the most obvious issue was the armholes. The armholes came very far down, impeding my arm movement an awful lot.


It bunched up as shown above when I moved my arms around at all. My first thought was raising the armscye, but I noted that the bust felt a little more comfortable when the jacket was bunched up around my shoulders like that, so I tried removing some vertical length from between my armpits and shoulders...


Pinning out the excess did seem to help, and achieved the goal of having free use of my arms (a somewhat important thing don't you think?)


I did some partial unpicking and slashed and overlapped all the pieces and stitched them down to check out this alteration a bit more (see above pics), and thought it was promising enough to transfer to my pattern pieces. As this alteration had reduced the overall length of the jacket, I added the length back in at the waist to make the jacket the length I wanted it.

And so my second muslin...


While the principle of my alterations were good, there are obviously still quite a few problems...

Two changes I could easily make to this muslin were that I had added the length too high in the back, and now the seamline of the back peplum piece is sitting too low, so I shortened the upper back pieces and lengthened the peplum to move this seamline up. I also added half an inch of width to the bottom of the peplum while I was redrafting it, to give the jacket a little more ease over my behind....


(Yes, that's my "I've spent a whole day on this muslin and it still looks terrible" face).

So, at the end of a day of muslining I still have a heap of problems, for which I'm thinking the following changes for muslin number three:

- Add a little more length back in where I removed it between the armpits and shoulders to hopefully alleviate some of the pull lines from the armpits
- Take the width of the shoulders in by about 1.5 at the top, tapering to nothing by the lower sleeve piece (note my comment earlier about being worried about making a size too small for my "shoulder breadth" - what a load of tosh that measurement is! It's too big in the shoulders, not too small!)
- Do a sway back adjustment to remove some of the pooling at the small of my back
- Do a small FBA through the middle of my "middle front piece", to add some more ease and shaping through the bust
- Possibly add a little waist shaping through the side seams.

What do you think? Would you make those changes based on the above photos? If not, what changes would you make?

...and if I do eventually manage to get a good fit, I then need to work out how to make equivalent changes to the lining pieces.

Which reminds me of another frustration with this pattern; the pattern notes that the lining is optional, however you have to print all the pieces, there's no option for printing just the shell and/or lining pieces. This is frustrating me right now in particular as I'd quite like to reprint just my outer pieces, but to do so I'll have to reprint the whole thing. The lining and shell pieces are completely mixed together on the pattern sheets, so it's not even like I could just print some of the sheets to print the shell pieces again. I'm very disappointed by this.

Strawberry Thief Belladone

$
0
0


Did you know that you can get Vans sneakers made from liberty fabric??! Back in mid-2013 there were 6 liberty prints available as Vans, however I only ever managed to find two of them in Australia, despite having decided that I must have the "Strawberry Thief" style. I also couldn't get them shipped to Australia easily, as supposedly they're imported here by a distributor.


Enormous thanks must go to the ever generous Poppykettle, who very kindly saved me a little bit of her precious luggage space from her trip to the US, to bring back these shoes for me (after I ordered them to be sent to her hotel).


Ever since achieving owning the shoes, I have also been plotting to make a coordinated outfit. Not a whole dress from the fabric, as that might be a bit too matchy-matchy, and also pretty pricey, but something using the liberty as a trim.


Just before Christmas, I bought this coordinating stretch sateen from Spotlight (although unimpressed with spotlight, 3 of the 5 pieces of fabric I bought that day had flaws in them, including this one. very unimpressed).

The liberty has so many colours in it that I had lots of different options for coordinating, but a lot of the possibles that I found didn't seem all that wearable. Bright pink? Too 'girly'. Pale Green? Too bright. Navy? No fun for summer. Then I spotted this steel-y blue. Yup, yup yup!


I chose to use the belladone pattern because it's perfectly suited to using bias binding as a feature. In addition to using bias on the back, and around the neckline and armholes, I also added a strip along each edge of the waistband, and along the opening of the pockets. I kept the bias binding as a thin line, making the visible width about 1/4".


I forgot to stitch down the top few inches of the pleats in the skirt, and may still go back and stitch them down by hand, as it really does make a big difference to the look of the skirt.


I was on a real hand sewing kick while making this dress. The first seam of the bias binding was done by machine, but the second side stitched down by hand. I also hand picked the zip up the back and did a hand stiched blind hem.


This dress has been a little while coming, but I'm thrilled with the end result. I'm expecting it to be great all year round, as I hope it'll be suitable to wear in colder weather with a long sleeved t-shirt and tights underneath.


Also, it turns out that it's pretty tricky to take photos that highlight that the dress and the shoes are coordinated, as the liberty on the dress is so far away from my feet!


Pattern: Belladone by Dear and Doe
Fabric: Stretch Sateen from Spotlight, "Strawberry Thief" Liberty Lawn from L'ucello
Notions: Thread, interfacing (for waistband), matching dress zip


See also:BusyLizzie, Millydodo, Tabatha Tweedie


So, dress coordinating with my shoes; Awesome or a little bit tacky?

Faux-Sureau

$
0
0
Have you seen the Sureau pattern by Deer and Doe? It's a lovely dress pattern with gathers either side of a little placket down the centre front. This dress is heavily inspired by the sureau pattern, except I altered my bodice block to make the pattern rather than using the actual sureau pattern, hence faux-sureau.


I have a confession however; I actually made 90% of this dress almost a year ago, but I didn't finish it off before the summer weather disappeared, so there didn't seem much point finishing it off then, when I wasn't going to be able to wear it for another 9-10 months. So I finished this off in my Christmas sewing binge, and what a satisfactory project it was, as all that was left was the zip and hem! I was finished before I knew it!


The pattern alteration was pretty simple. I rotated the bust dart to the centre front and converted it to gathers, subtracted the desired placket width, and changed the neckline to a v-neck. I may have been a little over-eager with this last alteration, and it's a little lower cut than I would normally make. If I were to make it again I would also move the gathers down a little so they're centered over my bust rather than being over the top half.

Rather than completely mimicking the sureau and adding a gathered skirt, I added the good old standby belladone skirt as I preferred an a-line skirt over a gathered one.


To correspond with the lightweight seersucker fabric and keep this a lightweight summer dress, I left the skirt unlined, and lined the bodice with a very light weight voile (principally to finish the edges rather than to 'line it'). I also found that some tiny prick stitches down the placket made the bodice front sit much nicer. Lastly I hand picked a dress zip into the back of the dress.


I'm fairly happy with the fit. I did some stupid alterations to take the waist in, which in hindsight I would have done differently (or ideally made the waist the right size to start with!). These alterations make the skirt sit a little funny, but not so much that it's a big issue. The bigger issue is that while the fit of the dress is pretty good when I'm stood up straight with my shoulders back (y'know, good posture we all like to think we have but don't really), as soon as relax and hunch over the neckline tends to gape a little.


Pattern: Self-drafted bodice, Skirt from Belladone by Deer and Doe
Fabric: Pear Print Seersucker from Spotlight
Notions: Thread, matching dress zip, voile for lining.

See alsoBimble and PimbleTybalt King of CatsThe Nerdy Seamstress

A different type of craft...

$
0
0
There has been less sewing around these parts lately, as I've been experimenting with alternative creative persuits, namely drawing.

Over Christmas I found a few free drawing classes on Craftsy, so enrolled in them both and then Darren and I completed them together. The first class was "Figure Drawing: An Essential Guide" and was a really great class. In the class Patricia takes you through the process of drawing a person using pencil.

Most times I've drawn anything in the last decade or so I have been frustrated that I couldn't get my hand to draw what my mind was imagining. My pictures would end up with weird proportions and not look like what I was aiming for at all. Therefore, I was surprised at the drawing I ended up with, finding her envelope technique really great for actually ending up with a picture that looked like what it should.

My picture from following along with "Figure Drawing: An Essential Guide"

We then went on to watch the second available class called "Draw Better Portraits". We didn't follow along with this class as we didn't have the required materials (charcoal and a more glossy paper). It was an interesting watch, but nowhere near as beneficial as the first class.


A couple more pencil drawings using the principles from the figure drawing class

After a couple more practices of what we learnt from the Figure Drawing class (above), we decided to investigate what other classes were available. After reading the descriptions and the trailer videos (which I wish more had clips of the instructor actually speaking to let you get an idea of their style) we ended up with quite a few in the wishlist, and one in my cart; "Radiant Portraits in Coloured Pencil".

My drawing from the "Radiant Portraits in Coloured Pencil" class

I have spent the last week working through the class, with a visit back to the art store in the middle to get more coloured pencils, and have reached a point with my drawing where I've decided to stop. I'm sure I could keep on going with the picture, but I have to decide to stop at some point.

I selected this photo by Sergey Stoylovsky to use as my reference photo:


One thing, not suggested in the class, that I found helpful when drawing the framework was to overlay a grid on the top of the photo. I didn't draw a grid onto my paper or anything, but it helped provide a base for the proportions and alignment of the different aspects of the image, which was a great assistance when I was drawing it onto the paper.


The below photos show the progression of my drawing. In the class Kerry has you start by drawing the framework of the image in a pale pencil, then you start building up the values in fairly neutral colours, then you start refining the colours and values.


I found the process incredibly relaxing, and enjoyed the challenge of working out how to build the colours I needed (particularly when I didn't quite have the colours I think I would have liked to use). It is so surprising how a colour behaves when you're using it on top of another colour, as opposed to straight onto the paper.


The paper we bought wasn't as dark as the one she recommends, so I had some challenges using the techniques that Kerry introduces in the class, but I worked it out in the end. We have since bought darker paper so I'm looking forward to using that for my next drawing.


My goal going into the coloured pencil class was to draw something that I'd be happy to frame and put on my wall. I expected this goal to take multiple drawings and much practice to achieve, but given that I keep being drawn back to the table to look at my drawing I may well frame and put up this first drawing! I shall have to try another picture to see if I have infact discovered a before unknown talent or if this was simply a fluke!

I'm not saying that my picture is perfect, it's far from it. There are many things I would change if that were possible, and I will bear those in mind for my future pictures. While her head isn't quite at the right angle, her hair is miles from accurate, her lips leave quite a bit to be desired, and some of the shadows aren't quite right, the fact that it is a very recognisable likeness of the reference picture has got me absolutely thrilled.

What about you, have you done any portrait or figure drawing? Please share pictures with me if you have.
Have you done any of the Craftsy classes? If so, which ones and would you recommend them?

Note: The links to Craftsy in this post are affiliate links. If you click on them and sign up to craftsy and/or buy any courses within the specified time limits I will get a small commission, and I will be very grateful. However, I paid for the Craftsy class I'm talking about in this post, and would have written exactly the same post even without the affiliate links (actually I did, I added the links after writing the post).

How do you store your photos?

$
0
0
This weekend I've been doing a bit of digital spring cleaning; I've been sorting files on my laptop and it's got me pondering about something...

Sewing and blogging leads to lots of photos of our makes, it's inevitable. Sewing isn't one of the blogging genres that lends itself to mostly picture-less posts. Until now I've been storing all my photos together, folders by year, then separated by 'event' (and then sub-event folders if applicable. These folders are then named in the "yyyy mm dd - description" format to keep the folders sorted chronologically but with information of what's in them. "Normal' photos lend themselves quite well to this system, and I intend to keep it that way for those, however sewing photos don't work quite as well being sorted by date.

It seems to me that sorting them by project makes more sense. Sorting them by date is less relevant, and makes it harder to find a specific project's folder. Particularly as often on the bigger projects have photos spanning multiple dates, sometimes even months (or years).

Therefore, I'm thinking of changing my digital photo storage system to split the 'normal' photos from the sewing ones, but I'm still pondering the best way to organise the sewing photos. Should I still keep it by year? Should I name the folders by the project name, or pattern name, or garment type? And which will come first and be the primary order of the folders? Should I keep the date in there somewhere? or the pattern company? How will self-drafted designs fit in with this?

(This is my, erm, particular side coming out. I like things to be precise and to make sense).

And so, I thought I'd put the question out there - do you have a system for organising/naming your digital sewing/blogging photos? If so, I'd love to hear about it please!

Floral Eva Dress

$
0
0

One of the things I love about my sewing friends is he generous they are. Generous with their time. Generous with their knowledge. And most relevant to this post, generous with their stashes. You've seen my profits from other people's stashes before, most recently the fabric from my first Granville. The subject of today's post is another example of others generosity, this time the lovely Kathleen.

At social sewing a few months ago Kathleen had brought some fabrics along to find a new home, and I pounced! I grabbed this gorgeous rayon jersey, and also some lovely brown suiting.


I knew right away what this fabric was going to become; another Eva dress. The fabric is almost identical in properties to the rayon jersey I used before, so I knew I could use the same alterations as last time. I also did a bit of a pattern hack to remove the pleat in the back of the skirt.

My only issue with this version is the pronounced lines coming down from my neck. I think this is at least partly because I took the back bodice in at the centre back too much. I might try unpicking the clear elastic I put in the back neckline and replacing it with a longer piece to let the back neckline be a bit wider.


Other than that I love the dress. The print is just stunning. I don't think I've ever seen anything like it in any shops. Thank you Kathleen! I am very grateful for your generosity.

An update about Social Sewing in 2015

$
0
0

Apologies to those of you not in Melbourne that this isn't relevant to, but I have some updates relating to Social Sewing that I need everyone to see:

1) The April social sewing date has been cancelled. It was on Anzac day and they have only just told me that they're not open that day. Frustrating, but that's what it is. Unfortunately there aren't any other dates available in April. Please update your calendars so you don't accidentally turn up and it's not on. If you're interested in going somewhere else or doing something else that day, let me know. Perhaps we could finally organise that picnic?

2) Housekeeping - I have been asked to remind everyone to please clear up after themselves before they leave. Please return extension cables to the baskets, and clear up any rubbish and fabric scraps. They will vacuum up threads on the floor, but other than that please try and leave the room as it is when we arrive.

3) Heads up that GJs are moving. In late May they are moving to Darebin Road in Fairfield. Our bookings for the rest of the year still stand, but will be at the new location, which I am assured also has a work room and has more parking than the current location. Apparently the building is being torn down to put up apartments instead. I'll let you know when I have more information.


All the details for social sewing can be found here. If you're in Melbourne and have never joined us, you're more than welcome to, we're a welcoming bunch and the more the merrier!

Any questions let me know, otherwise I'll see you in a fortnight at the next social sewing.

Bathers! I made Bathers! (The Bombshell Swimsuit in fact)

$
0
0

[How amazing was the view from our hotel? We were on the 18th floor]

Why is it that getting photos of bathers is infinitely more weird than photos of anything else? The sneak peek I posted on instagram suggests I finished these in October 2013 (below left), so it's been well over a year now, eek!


These have been well worn since completing them, coming with me on not one, but two beach holidays to Queensland (another instagram piccy shared on the first of those trips, above right), and worn on a few afternoons that were spent lazing in the pool at my old flat.

I tried taking some photos on a weekend trip to Warrnambool, where my friend's family had a spa we took advantage of. However, photos in the spa still felt weird. What I really needed was a beach. Thankfully, another opportunity presented itself, with my second beach trip to Queensland, this time to celebrate my Gran's 90th birthday (Happy Birthday again Granny!). In case you're wondering, these pics were taken on the beach at Coolangatta, which is just on the Queensland-New South Wales border.

[apologies for the squinty face, it was really bright!]

Despite the long period between completing this make and this post, I am still excited that I made bathers though, BATHERS! (For the international among you, 'bathers' is a fantastic Aussie term for swim suit or bathing suit, which I have eagerly adopted into my vocabulary)


The fabric was from Rathdowne Fabrics, and the lovely lady that served me helped me pick out a lining fabric to use too. This wasn't my original choice (which I also ended up buying and is waiting patiently in my stash to be transformed) but I decided that this print would look better ruched.

The pattern is the Bombshell Swimsuit from Closet Case Files. I picked the view with the halter, as I thought it would be more supportive and flattering than the other view. However, rather than get strain on my neck from the halter straps, I extended the straps and after crossing them over attached them to the back. This worked really really well, and the swimsuit feels both really secure and comfortable when I'm wearing it, which is exactly what I was after.


I also added some width to the top section of the pattern to give some more coverage at the sides, and didn't leave a gap between the two pieces at the centre front. The only other change I would make next time is to be more careful with the back gathers, focusing the gathers further up, as I get a bit of gather 'sagging' right at the bottom which I think could be avoided.

When choosing which bathers pattern to make, I was concerned about the front skirt-like part of this pattern and how practical and comfortable it would make the bathers, as I've never owned anything like this before. I have to say now, I'm completely converted! It's comfortable, doesn't go anywhere you don't want it to, and (I think) flattering. A big 10/10 from me.


I stitched the bathers together using the triple 'stretch' stitch on my machine, and then zig-zagged over the raw edges to keep them neat. The stretch stitch is great, it's really secure and also just as stretchy as overlocking would be. I had done lines of basting stitches to gather the ruched panels and it was really fun stretching out the pieces after stitching the seamlines to break the basting/gathering stitches to make them easier to pull out.


I followed the instructions as written, albeit with a lot of complaining about the formatting of the instructions. The instructions are incredibly comprehensive (which is good), but I found it frustrating that there are multiple steps per point. This led to the requirement to re-read each section multiple times, meaning it took longer and required more brain power than necessary, to make sure that I didn't miss anything accidentally. I would prefer it if the instructions were broken down into a step per point.


Incidentally, I have the same issue with the recipes in the Jamie Oliver cook books that I have, where I have actually missed a step in the middle of a big paragraph before, leading to a ruined dinner. If I were to make these again, or any other patterns with similar style instructions (I don't know if the other Closet Case Files patterns are the same), I would do what I now often do with Jamie's recipes and re-write out the instructions breaking down the paragraphs into their individual steps.

        
Pattern:Bombshell Swimsuit by Closet Case Files
Fabric: Swimsuit Lycra from Rathdowne Remnants
Notions: Swimsuit Lining fabric, clear elastic, thread

See also: The Hand Stitched Files, Sewaholic, Sallieoh


Have you made bathers (or whatever you would call them)? Can you explain the weirdness behind getting photos of them??

Kimono Tee

$
0
0

While trying to sew clothes that I know I will wear, it's easy to fall into a 'safe' zone and repeatedly make very similar items. I've been trying to keep at the back of my mind a push to mix in some experiments where I try things that aren't necessarily part of my safe zone.

This project is one of those that's very slightly outside my safe zone. The pattern is the Maria Denmark Kimono Tee, a free pattern that you can get by signing up to her newsletter. I know it really probably does still seem very safe, but I sometimes find it tricky with clothes that have positive ease but are still flattering.


I made the BL size, lengthening the sleeves by about 11cm (as described here). I may yet cut them down to the drafted length to see how that feels. We'll see.

The top is quite long, but I quite like the 'bunched' look that it gets as it comes to a rest at my hips.

I also tried finishing the neckline with clear elastic, which I probably wouldn't do again as it isn't sitting all that well, with fabric of this weight at lest.


I showed this top to Darren mid-construction and asked him what he thought of the fit, and he said it looked good except asked if I would be taking it in at the waist. Uh-oh! Despite his comment, I didn't take it in at all, as I wanted to try the loose style, as I hoped it would also make a good blousey fit when tucked into skirts. I think I've achieved this, and think it looks alright both un-tucked and tucked in.

I haven't actually worn this yet, but look forward to it. Hopefully the merino will make for a nice cosy but adaptable work top.


Pattern: Maria Denmark, Kirsten Kimono Tee
Fabric: Merino Jersey from The Fabric Store
Notions: Thread, clear elastic

See Also: SewSquirrel, Crafting A Rainbow, La Sartora


What about you, do you try and sew outside of your safe zone? What proportion of your projects are 'safe' vs 'experiments'?

Instructions for PDF patterns; how do you read them?

$
0
0
I've been using quite a few PDF patterns lately and therefore I've been needing to make the decision about printing the instructions when I print the pattern. Most of the time I haven't bothered printing the instructions, because unless I know I'll be doing most of the sewing away from home (e.g. at a retreat) I don't usually print the instructions, and instead just read them from my laptop. If I happen to be sewing without my laptop and need just a few steps of the instructions (e.g. at social sewing) I'll look it up on my phone.

Thinking about it now I have had a thought that I could potentially load the PDFs onto my kindle for use when I'm not near my laptop.

And so, it's gotten me wondering if I'm the norm, or if most people print their instructions. Also, perhaps someone has a clever approach I've never thought of.

How do you usually read the instructions? 
Do you print them out along with the pattern or do you save the paper and read them digitally?
If you read them digitally, how do you do that?

Felicity Dress

$
0
0

In January I pattern tested Jennifer Lauren's newest pattern, the Felicity Dress. The timing was great, because I ended up with a lovely summer dress that's seen a reasonable amount of wear already.

The bodice is cleverly designed, with the shaping through the centre front seam and neckline gathers. The dress is unlined and the arm and neckholes are finished with bias binding. I made up a quick muslin of the bodice, and was very pleasantly surprised to discover that in general the bodice fit fantastically as drafted! I have since learnt that Jennifer drafts for a D cup, something I didn't know before. For reference, I made a size 12.

Now, I'm a rebel. I knew I wanted to make the 3/4 circle skirt view, but the pattern states that I need 150cm wide fabric tor this. However, I wanted to make the dress from fabric from my stash, and selected this lovely cotton lawn that I've had in my stash for aaaages (it was originally going to become a Jasmine blouse before I decided that Collette patterns aren't for me as they require too many alterations to fit me). The problem was that the fabric I selected was only 115cm wide. The limiting factor with the fabric width is the front skirt piece, so to make it work with my narrower fabric I added a seam down the centre front of the skirt.


Because of this I disregarded the cutting layout. I made two layers by folding the fabric lengthwise, cutting it in half and rotating to preserve the direction of the print. My fabric was 2.4m long, and was the perfect amount for View A in size 12.

With regards to the pdf pattern, I like how Jennifer has separated the pattern pieces for the different views, so you can easily print just one view. However I missed the existence of ‘markers’ to line up my pages while I was sticking them together.

The one thing I don’t like about my dress is the pockets. I find the functional part of the pockets too small/shallow and am concerned as to the security of the stuff in my pockets when wearing the dress (I’m a big pocket user), at minimum my phone lives in my pocket. I think that my issue with the pockets is primarily due to how low the top edge of the pocket scoops down, so if making this again I would raise the top edge of the pockets by at least 1-1.5” at the side seams, and potentially also add some extra depth to the bottom of the pocket. To check dimensions I think I would compare it against another pocket I know I like, for example the Hollyburn pockets, to check these alterations.


I made some small adjustments to the bodice, which I would do again for subsequent versions. I shortened the bodice by 2.5cm and raised the bottom of the armholes by 1cm. Jennifer has actually raised the front bodice at the shoulders by 1cm after the pattern testing was completed and by 0.5cm at the front waistline, so if I were to use the final version of the pattern I wouldn’t need to adjust the armholes, and would only need to shorten the bodice by 1cm. However, I would need to bear in mind that the neckline is 1cm higher than on my version.

I also took the bodice in by about 3cm total (8mm at each side seam) at the waist. I don’t know if this is an artefact of my fabric, because the maths on this don’t make sense, as there’s only 0.5" ease drafted for the waist, and my waist measurement is the same as that for the size I made. This alteration I wouldn’t make on the pattern, but would play it by ear during construction in case it was an artefact of my fabric.


I found the bias binding instructions confusing in the pattern testing version, however they've been rewritten and look much better now. One thing to note however is that I purchased 25mm binding as I couldn't find 20mm in the right colour so planned on cutting it down (I figured this would still be easier/cheaper than buying fabric the right colour and making my own). However, when I measured my 25mm binding flat it was the desired 40mm width, so just repressed it without cutting it down. So there’s a tip for you; always double check the flat binding measurement too, in this case you want 40mm binding.

Which brings me onto my next comment, the neckline and armhole have a 10mm seam allowance, which is marked on the pattern pieces. However, the finished edge isn't actually 10mm from the edge of the pattern piece, but is exactly the same as the pattern piece, as you stitch bias binding enclosing the edge of the fabric. That felt like a convoluted sentence, hopefully it made sense.


The instructions have you do a lapped zip. I tried following the instructions and my zip was a massive fail, somehow my seam allowance wasn't anywhere near wide enough for the lap to actually work. I'm not sure where I went wrong, but in the end I just unpicked the whole thing and did a hand-picked centred zip. While I’d always thought you should do a 2cm seam allowance for lapped zips, my failure is most likely due to me and shouldn't reflect badly on the pattern. I understand that Jennifer is going to be doing a detailed photo tutorial of the lapped zip insertion method as part of her sewalong for the dress, so I look forward to reading that to see where I went wrong.

I also made a change at the top of the zip at the centre back, changing the order that I folded the bias binding under as I think my order made it a bit neater. I also hemmed the dress differently to the instructions, just overlocking the edge and then folding it over once with a 1cm seam allowance and topstitching. This is my go-to hemming method on full curved hems on a lightweight dress like this. It made the dress 1.5cm longer than drafted, which I'm also happy with as I love the length I've ended up with.


Pattern: Felicity by Jennifer Lauren
Fabric:  Cotton Lawn from Spotlight
Notions: Thread, Bias binding, 24" dress zip

A quilt for Neal and Helena

$
0
0
Today I am finally sharing a very special quilt. This is the project I alluded to as my 5th hit in my hits of 2014 post. It is now with its intended recipients so I can blog about it all I like. This is a very special quilt, and a true collaboration between myself and my Gran.


My cousin Neal got married to his lovely wife Helena in November of 2013. The wedding was on the beach on Stradbroke Island in Queensland, and it was absolutely beautiful (see above), a really lovely day to be part of. If I'm remembering correctly they had requested/suggested a quilt as a wedding gift from my Gran. Granny and I decided that I could help with the quilt, so we started working on it when she was visiting Victoria for the first few months of last year.


Granny wanted to make a medallion quilt design, so we sat down with some paper, a ruler and pencil and experimented with a few designs. I had learnt with the previous the medallion style quilt I've made that it's a lot easier to design the quilt if you have a base unit of measure that each border is a multiple of. We tried a few variations and different borders and such, and eventually settled on the design you can see in the photos, involving quarter square triangles, squares, flying geese, applique and plain fabric borders.


Granny knew she wanted to include turquoise as one of the main colours (the main colour chosen at the wedding, for the decorations, bridesmaid's dresses and groomsmen's ties), and also wanted it to go well in their bedroom, which has a royal blue wall and a lovely painting on the wall with some orange in it (which isn't the room pictured here). From here we had our main colour scheme so went hunting for fabric.


All the fabric was bought at GJs Discount Fabrics, and we tried to pick a range of colours, from pale to bright to dark, and a range of print sizes, from large prints to small prints to solid colours. I particularly like the addition of the orange with the blue and turquoise, I think it's made for a really fresh looking quilt.

One of the fabrics we chose had a larger floral motif, that Granny decided to applique onto the large turquoise border, along with some bias strips and similarly cut out leaves.


Granny did the majority of the piecing of the quilt, although I helped with a little bit of it and with some of the cutting. For the quarter square triangles in the middle we used this method and for the flying geese we used this method.


Once the piecing was finished, I was in charge of quilting, and I ended up doing a combination of free motion quilting and straight line quilting, varying the quilting design to suit each border. We discussed a few different options, and quickly settled on stippling on the quarter square triangles in the centre and the border of squares. It took a little more thought for the other sections.


Darren made the fantastic suggestion of cross-hatching the background of the applique border, so I stitched all the way around the edge of the applique, and then marked the cross hatch lines at 1" intervals, first doing one direction then the other. There was quite a bit of quilt manhandling required to do the cross hatching, as I went back and forth along the lines but I am thrilled with the outcome so glad to have bothered. Having spent my time basting properly and using my walking foot, I didn't have any issues with puckering of the fabric when I was doing the second pass of the crosshatching, which I had been a little concerned about.


In the end, after trying a few different options (including in this baby quilt) I decided to just stitch in the ditch of the flying geese. I just went back and forth in a zig-zag along each side of the geese to reduce the rotation required of the quilt.


For the larger blue outer border I had decided very early on that I would just do concentric squares around the border, and when deciding how far apart to do them I decided to make them progressively further apart as they reached the edge of the quilt.


The quilt is finished with some orange binding, and it has a turquoise backing (from the backing section at GJs so we didn't have to piece the back, hurrah!)


A big project, and I'm absolutely thrilled with how it turned out. I was secretly hoping that Neal and Helena wouldn't like the quilt and I'd be able to claim it. Sadly that wasn't the case, so it has a happy new home with them.

Will you share your measurements with me?

$
0
0

Will you do me a quick favour?

I am hoping to collect some data on women's measurements, so I've created a quick form to collect this data. I am collecting four core measurements, along with another 5 optional ones. If you'd grab a tape measure and take a few minutes from your day to help me I would be incredibly grateful.

Even more good karma will be sent your way if you share around the link to other women you know.


On the hunt for the perfect fabric pouch...

$
0
0
Firstly, thanks to everyone that has filled in my little measurement form from my last post. If you haven't filled it in yet, please hop over to the post to get the details and link.

And onto the business of this post...

We potentially have some travel coming up, so I've been contemplating options for organising our things in a flexible and portable way. One obvious option is sewing up some fabric pouches for storing things in.


I quickly made up this Open Wide Zippered Pouch from the tutorial by noodlehead from fabrics etc from my stash to try out the style.

I quite like the pouch, as it has a square base so sits nicely on surfaces, and you could even line up a few in a drawer for example and when open they'd tesselate together quite well. I'm not sure if this size is the right size for my needs, but overall I like the pouch so far, I've found it quite useful for ferrying things various places.


Does anybody have any other zippered pouch patterns or tutorials they can recommend?
I would like to try out a few before settling on my favourite and making multiple.

A Couple of Merino Plantains

$
0
0
I love my first plantain. I am still surprised how much I love the cut. Before making it I was expecting it to be too full around the hips and not flattering. However, if I cut a straight size despite my hip measurement falling in the next size up, it's not as full in the hips on me as drafted. It's just the right amount of hip skimming.


Since my first version has become one of those tops pulled first out of the pile after washing, I decided that some of the merino jersey in my stash should become plantains. Merino is perfect for the plantain pattern as it has beautiful drape to it. It's definitely suited more to drapey patterns than clingy ones.


The blue version is made from some merino we got for much cheaper than most of the merino. I don't know why it was cheaper, perhaps it was the previous seasons stock or something, as there's absolutely nothing wrong with it that I can tell. It's the merino I tried screen printing on for Darren, and is essentially my "muslin merino".


When cutting out the pink version I couldn't stand how much fabric was going to be left over so squeezed some other things onto the piece, so keep an eye out for those in coming weeks.

A few people have commented about the relevance of merino jersey in hot climates (with merino being wool). While yes, it's great to wear in cold weather, it's also great in hot weather. It absorbs moisture and is breathable; ideal! It really is a wonder fabric in my eyes! (I even took the blue version on my recent trip to the gold coast, and actually found it more refreshing to wear than the cotton/lycra tanks I wore on other days)


I still have a pile of merino jersey in my stash, so we shall yet see what it becomes, more plantains or something else?

Pattern:Deer and Doe Plantain
Fabric: Merino Jersey from the Fabric Store
Notions: Thread

Colour Blocked Kimono Tee

$
0
0
The real reason that I made the blue kimono tee is to test the pattern out as a candidate pattern for this shirt.


This shirt all started when I was preparing to cut out my pink merino plantain. I laid out the pattern pieces and saw just how much left over fabric there would be if I just cut the one shirt out of the fabric. I tried seeing if I could get a shirt and a singlet out of the fabric, but failing piecing one of the pieces of the singlet it wouldn't fit. I had thought of adding a horizontal seam across the back of the singlet to make the pieces fit, and asked other's opinion on instagram, at which point the suggestion of colour blocking came up.

I did some searching, and with some moral support from Jen I decided to have a go at making a shirt like this one I found on a google image search:


I selected some grey merino jersey from my stash that didn't have any immediate plans as the other colour for the colour blocking.

I considered a few patterns for this, but settled on the kimono tee as the most promising prospect, but decided to first make a wearable muslin.

As mentioned in this post I extended the sleeves to just above the elbow, to similar to the inspiration pic. Following the wearable muslin I also took a wedge out of the centre front and centre back, about 1" wide at the top tapering to nothing at the hem. I also adjusted the angle of the hem on the sleeves slightly.


Then I altered my base pattern to cater for the colour blocking, splitting the front and back pattern pieces in two, by drawing a line starting about 1.5" to the edge of the neckline on the shoulder seam and ending at the centre front at the hem. I then added the seam allowance to these new pieces.

If I were to do this again I would start closer to the neckline and make the seamline continue across past the centre front.

This time around I finished the neckline with a narrow strip of the grey merino and it's a much nicer finish than the clear elastic I used on the blue one. (I used the 85% rule for the length of the strip)


Overall, it's not as similar to the inspiration pic as it could have been, I probably could have added more ease through the bust. However, it's very comfy to wear as pictured here with jeans, and also works tucked into a skirt, so overall I'm pretty happy with this experiment.

Pattern: Modified Maria Denmark Kimono Tee
Fabric: Merino Jersey from the Fabric Store
Notions: Thread

A new shirt for Bear

$
0
0

Back in 2009 I made a nightshirt for "Bear" and he's been wearing it ever since, except for the odd occasion when I've washed it for him, and it's showing its age.

 
[Left: 2009, Right: 2015]

Therefore, I've been scheming for a while to make him a new shirt. However, everything I've made that's had big enough scraps to squeeze out a shirt for him hasn't been a very flattering colour for his blue-grey fur, so it's taken me a while.

However when cutting out the bright pink merino recently I managed to cut him a shirt out as well. Constructed almost exactly the same way as any of my shirts, except smaller, I made this one production-line style along with my pink merino plantain of the same fabric.


And so, the two of us have our matching shirts, and bear is looking much better dressed!

Amazing Fit Blazer - Some confusion

$
0
0
My quest to make a couple of jackets this year has certainly slowed down. There hasn't been any update on this goal as progress has somewhat stalled.

I made my decisions on patterns to try back in January, and the ziggi pattern turned out a bit of  pain at the muslin stage and so, is in the naughty corner.

Therefore, I subsequently turned to the other pattern that I had selected; the Simplicity 2446 "amazing fit" blazer pattern. However, I have only gotten as far as unfolding the pattern sheets and identifying the pattern pieces before I got confused and put it all away again.


To recap, I chose the 2446 pattern because I liked the idea of it having different bust sizes, meaning I could avoid a FBA and hopefully reducing the number alterations I'd need to make.

Because it's an 'amazing fit' pattern, it has quite a large section in the instructions on selecting your size. The principle is that "there are three unique sets of pattern pieces, each one for the different bust cup sizes". When it says 'three unique sets of pattern pieces' it actually means that there are three versions of the side front piece, all the other pieces of the jacket are the same.


The instructions for determining your size tell you to first find your bust cup size: by comparing the bust and high bust measurements, and determining cup size by subtracting one from the other; a 0.5-1" difference is an A cup, 1-2" a B cup and 2-3" a C cup. With a bust of 37.5" and a high bust of 35", that puts me comfortably in the C cup section.


It then says that the "patterns have all been based on the body measurements given. once you have selected your pattern size, compare your bust measurement to the chart given on the pattern envelope". So, I refer to the size chart...


The size chart refers to "bust" measurement, so based on that and the instructions I interpret it as saying I should select size 14/16 based on my 37.5" bust.. and this is where I got confused. Am I supposed to select my size based on my bust or upper bust measurement?

And this is where I got confused... It seems to me that if I select the size for my bust size and also select the option for cup size C I'm just going to end up with a jacket that's way too big for me all over (rather than too big everywhere except the bust).

Since the only difference between the cup sizes is the added size at the bust in the side front piece, it makes more sense to me to choose my size based on my high bust measurement; the overall bust circumference will be correct for my bust size, and the rest of the jacket will be proportional to my bust:high bust ratio.

However, the pattern doesn't actually say to do that. (I know sometimes I can take things too literally, but I think instructions like this is somewhere I can expect to take things literally).

Am I reading the instructions wrong? Should I select my size based on my high bust measurement? How would you proceed?

Unless I'm thinking it through completely wrong and somebody points it out to me, I think my plan will be to make up size 12 based on my upper bust measurement, along with the C cup side front piece for the same size. I've got some twill to use to make a muslin, as I figured I was better off using something with a little more body than


As an aside, I wonder if you also spotted the (other) glaring error in two of the pictures of the pattern above? The instructions refer to the three side front pieces as 2A, 2 and 2B, but the pattern piece inventory (and on the actual pieces) they are named 2A, 2B and 2C. Great work there Simplicity *rollseyes*
Viewing all 144 articles
Browse latest View live